Creating Itemized Lists
The Itemized List function enables you to create a list of items with corresponding amounts that can be attached to a specific field on a form. The total for the items appears in the field where you created the list. The itemized list becomes a permanent part of the form.
By default, Itemized Lists are rolled over from the previous year or period. To change this default behavior, see Rollover Manager Preferences.
To create an itemized list on a field in a return:
- In an open return, open the form to which you want to add the list.
- Move the cursor to the field where you want to add the list.
- Do one of the following:
- Click the Forms menu; then, select Lists; then, select Itemized Lists.
- Right-click; then, select Itemized List.
- Press Ctrl+I.

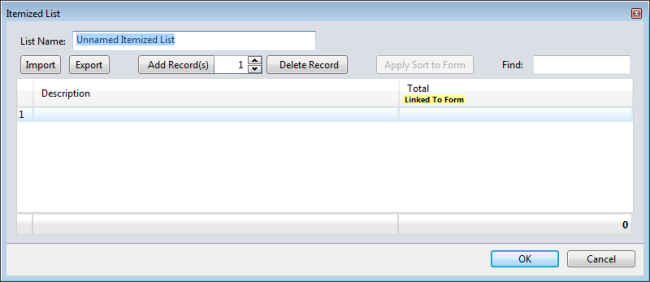
Itemized List dialog box
The cursor is positioned in the List Name field.
- In the List Name field, enter a list name.
- To enter the first item, place your cursor in the first row (1) and enter the Description and Total.
- To add another item to the list, click Add Record(s).
A blank record (row) appears (2) below the first row.
- Repeat this process until you've completed your list.
- Click OK when you're finished.
The form field now contains the total of the itemized list. The green background indicates that a list is attached to the field:

Field with green background indicates an attached list
Place your cursor on any field with a list, and then click the Jump To arrow.
Features of Itemized List Dialog
|
Field / Button / check box |
Description |
|---|---|
|
List Name field |
Enter a name for the list, as desired. |
|
Import button |
Allows you to import a .csv file into the list. See Importing Existing Files into Lists. |
|
Export button |
Enables you to export the list as a .csv file. See Exporting Lists. |
|
Add Record(s) button |
Adds a row to the list. |
|
Delete Record button |
Deletes the selected row from the list. |
|
Apply Sort to Data button |
Sorts data in the list. |
|
Find field |
Enter criteria by which you can search for an item in the list. |
|
OK button |
Saves items added to the dialog box and closes the dialog box. |
|
Cancel button |
Closes the dialog box. |
See Also: